If you’ve been coming to this website for a while, hopefully you’ve been reading all of my hockey systems posts. To date, we have discussed forechecking, puck possession strategies, powerplay strategies, penalty killing and face-off tactics. We’ve also covered Tortorella’s systems and philosophies with great depth, which you can read about here.
The one aspect of a hockey system we really haven’t talked about much are defensive zone strategies. The three most common systems are the strong-side overload, zone coverage/box+1 and man-on-man coverage.
Unlike other aspects of a hockey system, defensive zone strategies are not really implemented in a “one size fits all” approach anymore. The game has evolved. More and more teams are using certain strategies for specific game situations.
Strong-Side Overload
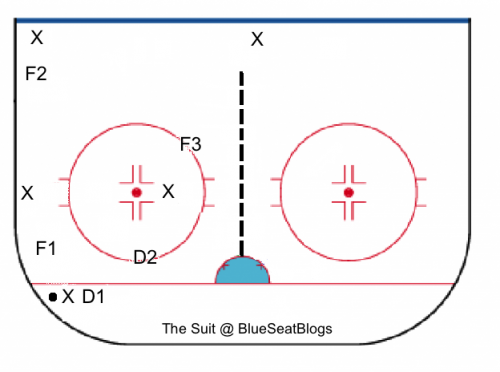
The idea of the strong-side overload is for the defending team to basically split the ice in half. As you see in the image above, the defending team looks to out-number (or overload) you on the strong side of the ice, squeezing the opposition of time and space.
Some teams will overload with 2 players going hard to the wall, 1 player playing just off the puck and 2 players defending the slot, but shading the strong-side. While other teams prefer sending three guys to the wall, 1 playing off the puck and 1 protecting the slot, also shading the strong side (as seen in the image above). Either way, the idea is to outnumber the puck on one half of the ice along the boards.
Teams like the Detroit Red Wings and Chicago Blackhawks love to cycle you to death and then crash the net. The strong-side overload is designed to stop that. Of course every system can be beaten and nothing beats the overload better than a hard accurate pass or a defensive miscue.
In this version of the overload, F3 is the most important player off the puck. He has to keep his head on a swivel and make sure he’s covering the slot. He also has to be aware of the weakside defensemen, who’ll likely want to pinch into the scoring area. Finally, he has to monitor the puck and be ready to transition to offense.
Some coaches will employ two defensemen along the boards down low and will use a forward to shade the slot, so F1 and D2 swap responsibilities. Others keep the responsibilities as shown in the image above.
Zone Coverage/Box +1

Last season the media made a fuss about the Rangers low zone strategy, which requires players to collapse around the net and block shots. However, more and more teams are adopting this style of play in certain game situations and the blocked shot totals are indicative of that.
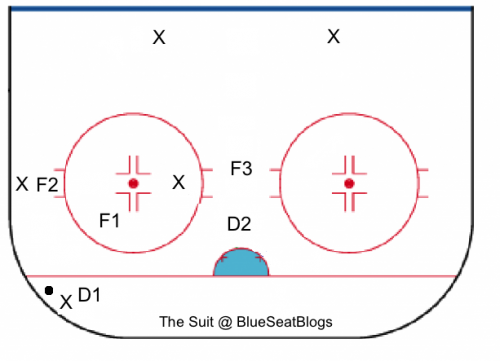
In this system, four of five, or all five skaters defend home plate (protect the scoring area) by staying below the faceoff circle. Most teams use the low zone collapse when the puck is either behind the net, or at the points.
Some teams will use a box+1 formation (show in the image above) while others collapse in a 2-1-2 formation (2 defenders on either post, 1 forward in the mid slot and 2 forwards just inside the face-off circles. Either way, the idea is to protect the house.
If the puck is behind the net, the defense tightens up its formation to protect against plays in the slot. If the puck is up at the points, some coaches will have the formation expand and get into shooting lanes, while others prefer the formation remain collapsed and block shots.
Man-on-Man Coverage
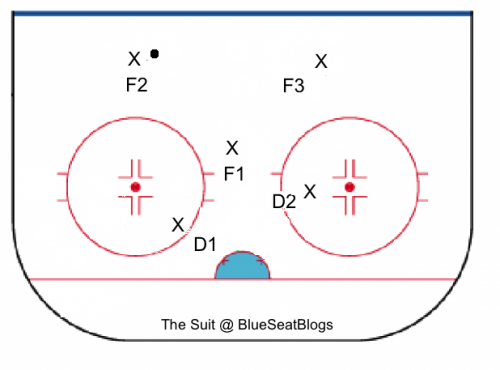
Some have pointed out they’d like to see the Rangers challenge the points more. What they mean to say is they want the Rangers to play more man-on-man coverage up high. Man-on-man is exactly what it sounds like. Every player gets a man and is on him “like white on rice.”
This system was popular prior to the 04-05 lockout, but the elimination of clutch and grab has made executing this system very difficult at The Show. Guys are just too creative and fast to play traditional man-on-man.
Instead, some teams have adopted hybrids where D1, D2 and F1 will play man-on-man down low and F2 and F3 will collapse in the slot and play zone. Other coaches have D1,D2, and F1 play zone in the slot and F2 and F3 will play man-on-man up high.
There’s a lot less switching in this system and defensive breakdowns can occur if you chase your guy outside of the scoring area (a big no no). However, once players get acclimated, it can help to create turnovers and limit the opposition’s time in your end zone.
So that’s defensive zone systems in a nutshell. Some teams will use a combo of strategies depending on the location of the puck. Others will pick a strategy and stick to it no matter what. Some coaches will pick a formation, but will want the players being more passive or aggressive depending on game situation, matchups, etc.
Ultimately, it comes down to your coaching philosophy and your level of comfort with your roster.
More About:Hockey Tactics