As the playoffs hit full throttle, the decisions players make (or don’t make for that matter) get further put under the microscope. While we tend not to overreact to one particular play, shift, or even one game on this site, player scrutiny for better or worse always gets turned up a few notches this time of year.
Perhaps no area of the ice fuels more debate around the blogosphere and Twitterd than what happens in the defensive zone. More often than not a goal will be scored, a chance will be created, or a unit will get pinned and out come the pitch forks. While we can’t stop the finger pointing, we figured we might as well at least try to teach people where to point those fingers.
For these reasons, today’s post will focus on basic coverage within the zone defense system.
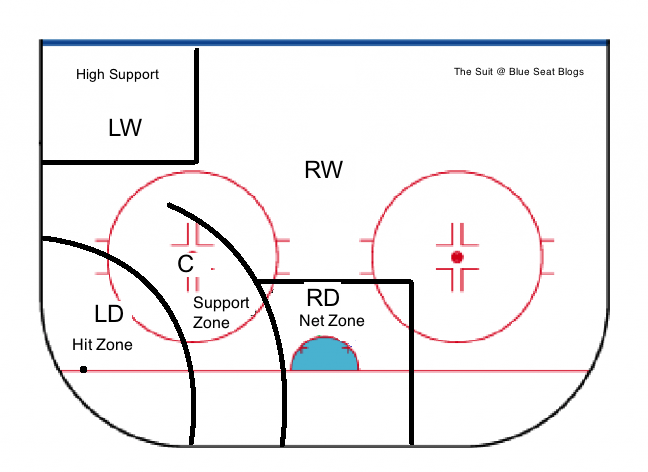
As drawn in the picture above (if you guessed I don’t work in graphic design, gold star for you) the lower area of the defensive zone is generally cut up into three key areas, the hit zone, the support zone and the net zone.
In our system, the strong side d-man is responsible for the hit zone. In this particular zone of the ice, the first d-man back (in this case the LD) must close in on the puck carrier or the forechecker looking to retrieve a dump in. Depending on the opposing forward’s body position and distance from the boards, the defensemen’s main job is to make a hit for a turnover. If a hit can’t be made then the defensemen must contain the forward by keeping inside positioning and staying between his check and the scoring area.
The next key area of the defensive zone is the support zone. This zone has two main responsibilities. The first is to defend against any passes from the hit zone to the slot. The second responsibility is to read and react to the success of the d-man in the hit zone. Should the d-man lose a battle or gain possession, this player is there for puck support. In many systems the center is in charge of the support zone, while in other systems it’s the first forward back that has the responsibility. A few others prefer D2 support and a forward protect the net. Mostly depends on player strengths.
Finally, the last area we’ll focus on is the net zone. As noted above, the net zone is generally the responsibility of the second defensemen back (in this case the RD). This player’s job is to protect the slot at all costs. Depending on strategy, the key to succeeding in this area is by keeping inside positioning on any net front presence. Though it’s true of all three positions, this man must keep his stick on the ice and make sure he’s communicating with teammates on any plays behind the net.
One thing people tend to get wrong about net zone players is they think the net zone d-man can never leave his post. This is incorrect. If the puck is rimmed around to the weak side, these zones actually flip. The net player (D2) can go after the puck and now be the new hit zone player. With that said, it is critical that a forward come in and cover the net zone until (D1) can get over to the slot.
These coverages and responsibilities seem fairly straightforward, but like anything else at The Show, they can be tough to execute at an NHL level pace. Thankfully this is one aspect of the game where the Rangers tend to excel, including Michael Del Zaster Zotto.
For more of an advanced look at defensive zone systems, please check out our post here.
Share:
More About:Hockey Tactics